AWS 101
Contents
AWS 101#
This tutorial will walk you thought getting on an AWS cloud instance from the ground up.
Marine Denolle and the UW team deliver a AWS Concept lecture, slides are below:
AWS web console access#
Note
For workshop participants:
Log in with your designated IAM User to this console: https://806812320051.signin.aws.amazon.com/console
Login with the username and temporary password sent to you prior to the workshop.
As a first log in, the auto-generated password needs to be replaced. Use a sophisticated password to confirm with AWS security standards.
Choosing a region#
An important aspect of cloud is that the computing and data centers are distributed around the world and labeled as “regions”. For fastest connection to data storage on S3, we recommend to choose the region where the data is. To choose a region in AWS, follow these steps:
Log in to your AWS Management Console.
In the top-right corner, click on the current region name (e.g., US East (N. Virginia)).
In the dropdown menu that appears, select a region (e.g., US West (Oregon)).
After selecting the region, all AWS services you use will be hosted in that region.
Note
Please use US West (Oregon, us-west-2) region for the tutorial.
Launching an instance#
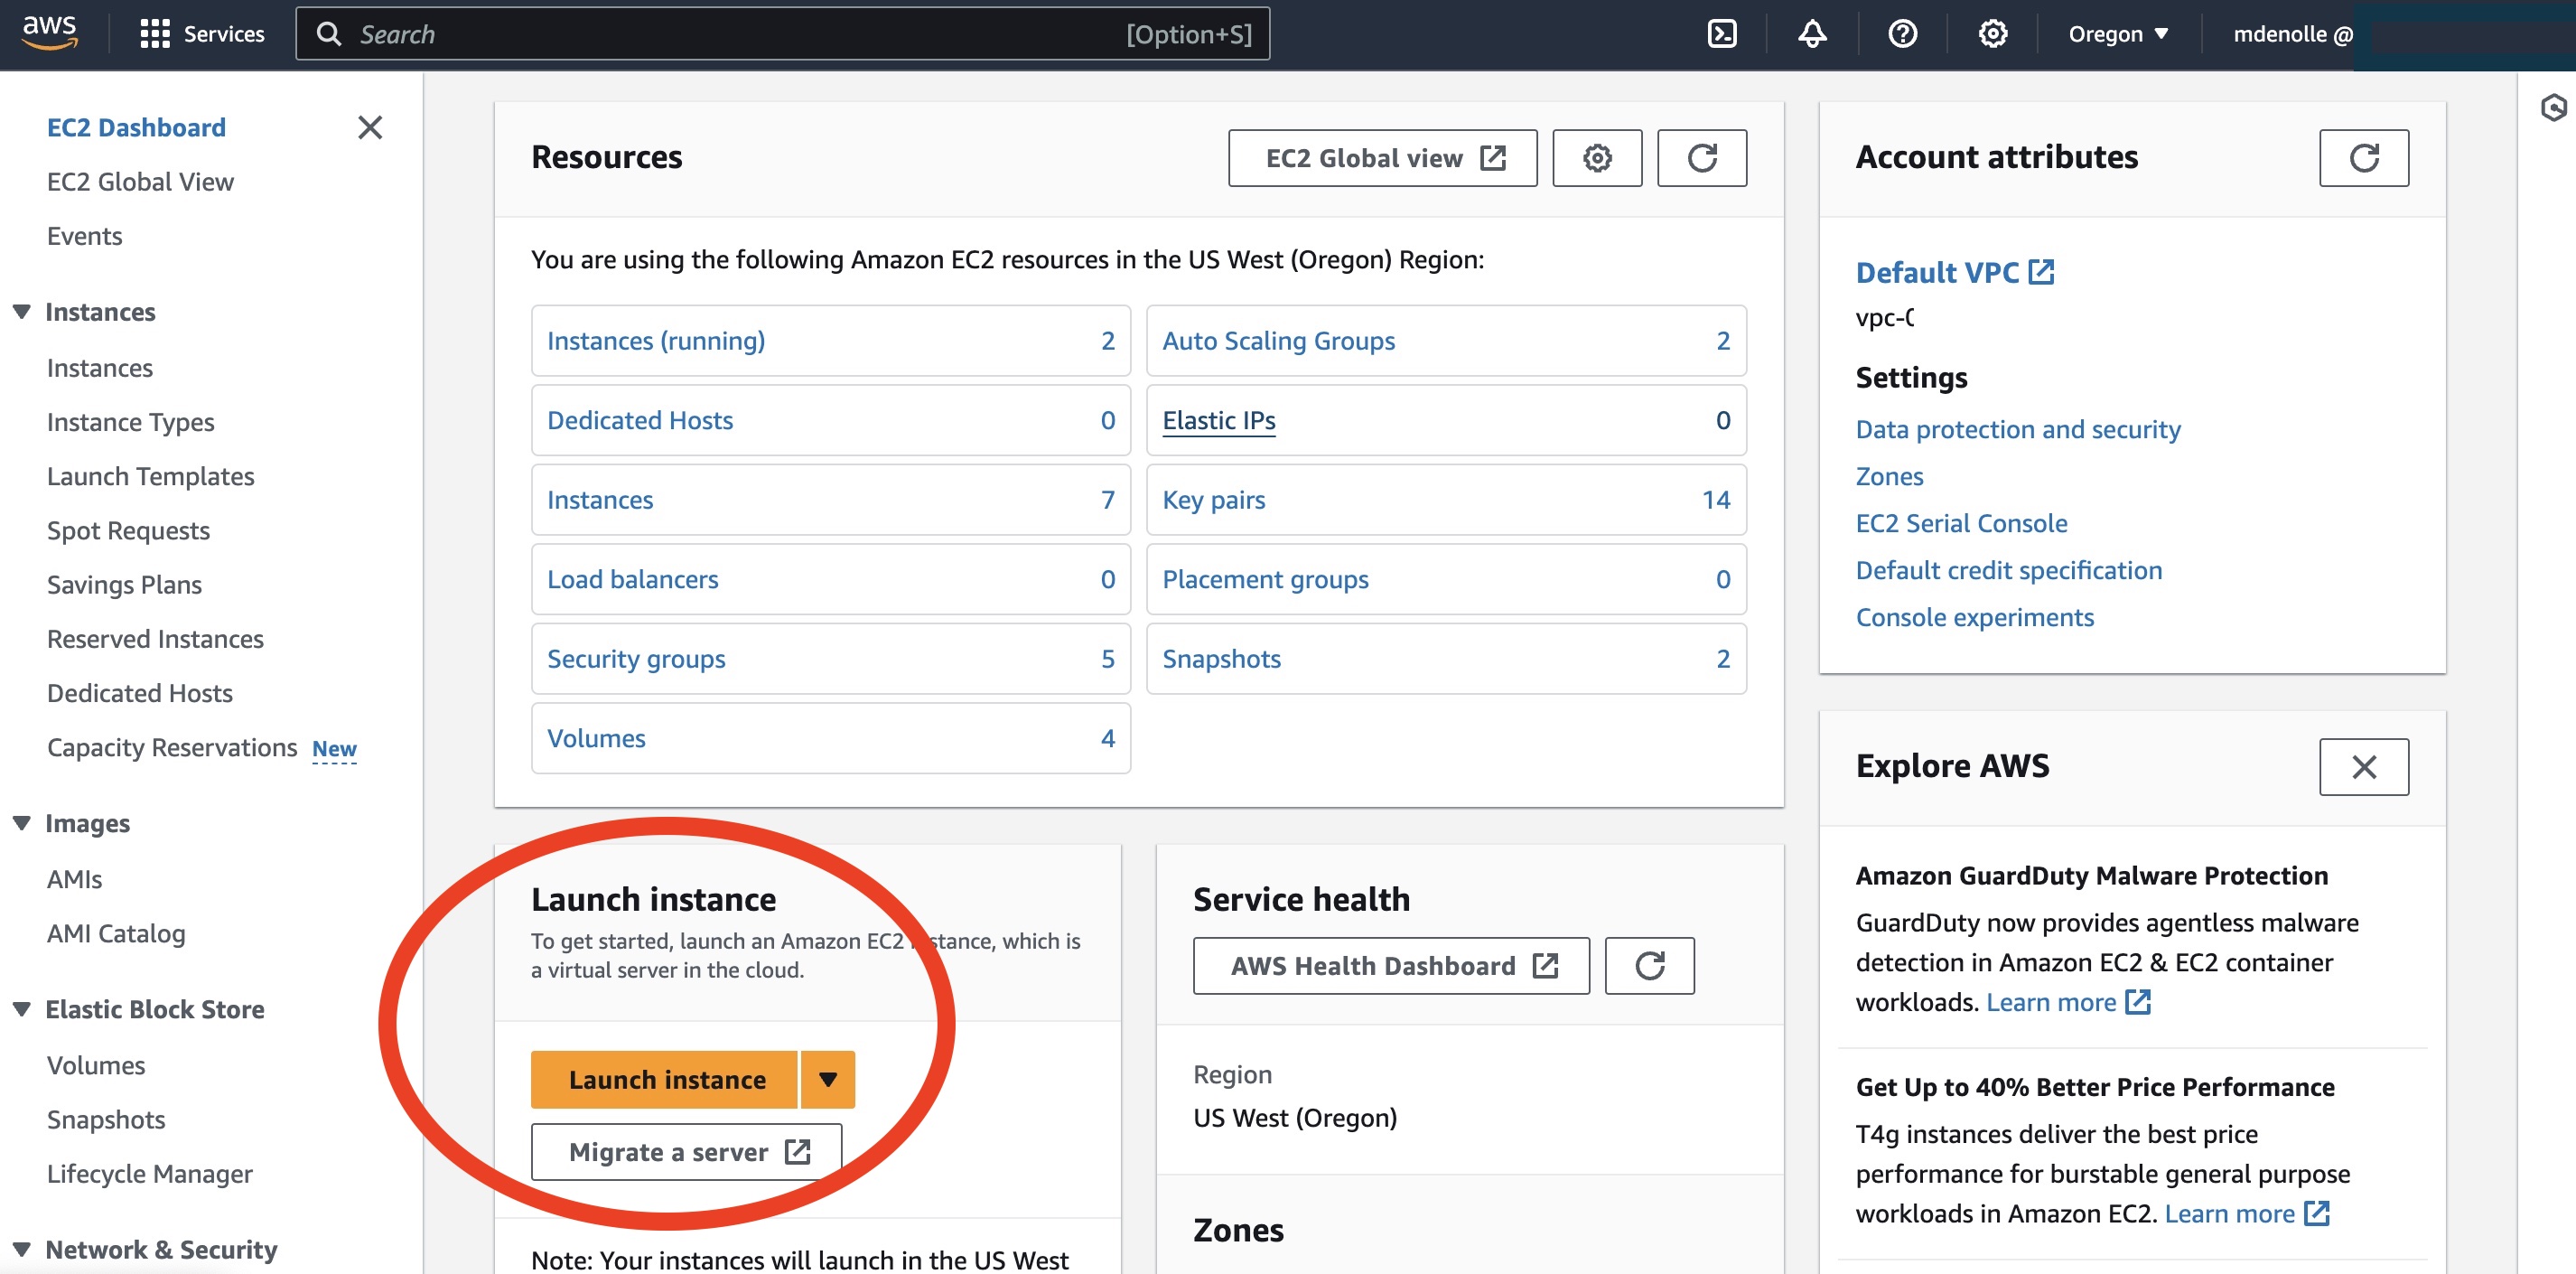
Launch an instance using EC2 (Elastic Computing Cloud). Follow the steps below. Screen shots of the steps are linked here.
In the AWS Management Console, search and navigate to the EC2 dashboard using the
Searchbox on the top.Click on Launch Instance to start the process of creating a new EC2 instance.

Name and Tags: Be specific for the best job management:
FirstName_LastName_Jobname.Application and OS Image: Choose the default
Amazon linux.Instance Type: This specifies the RAM, vCPU, network, etc.
t2.xlargeis recommended for this tutorial.Key Pair: Create a new key pair, or specify an existing one. Download the
.pemfile, move it to a location that you can have access to and remember where it is.Note
If the file does not save as
.pem, replace the extension with.pem.For Windows users, download the type ED25519 and the
.ppkfile.You can re-use the key created previously, if you still have access to that file.
This step is optional. You can skip it and connect only through a browser.
Network Settings: Select existing security group -> Select security group -> Select
default. This allows traffics in and out of the instance and is required for SSH (port 22) and Jupyter lab connection.Configure Storage: Add more storage to your instance. 20 GiB will be sufficient for most workshop agenda.
Launch instance with the current configuration. Wait until the instance showing a
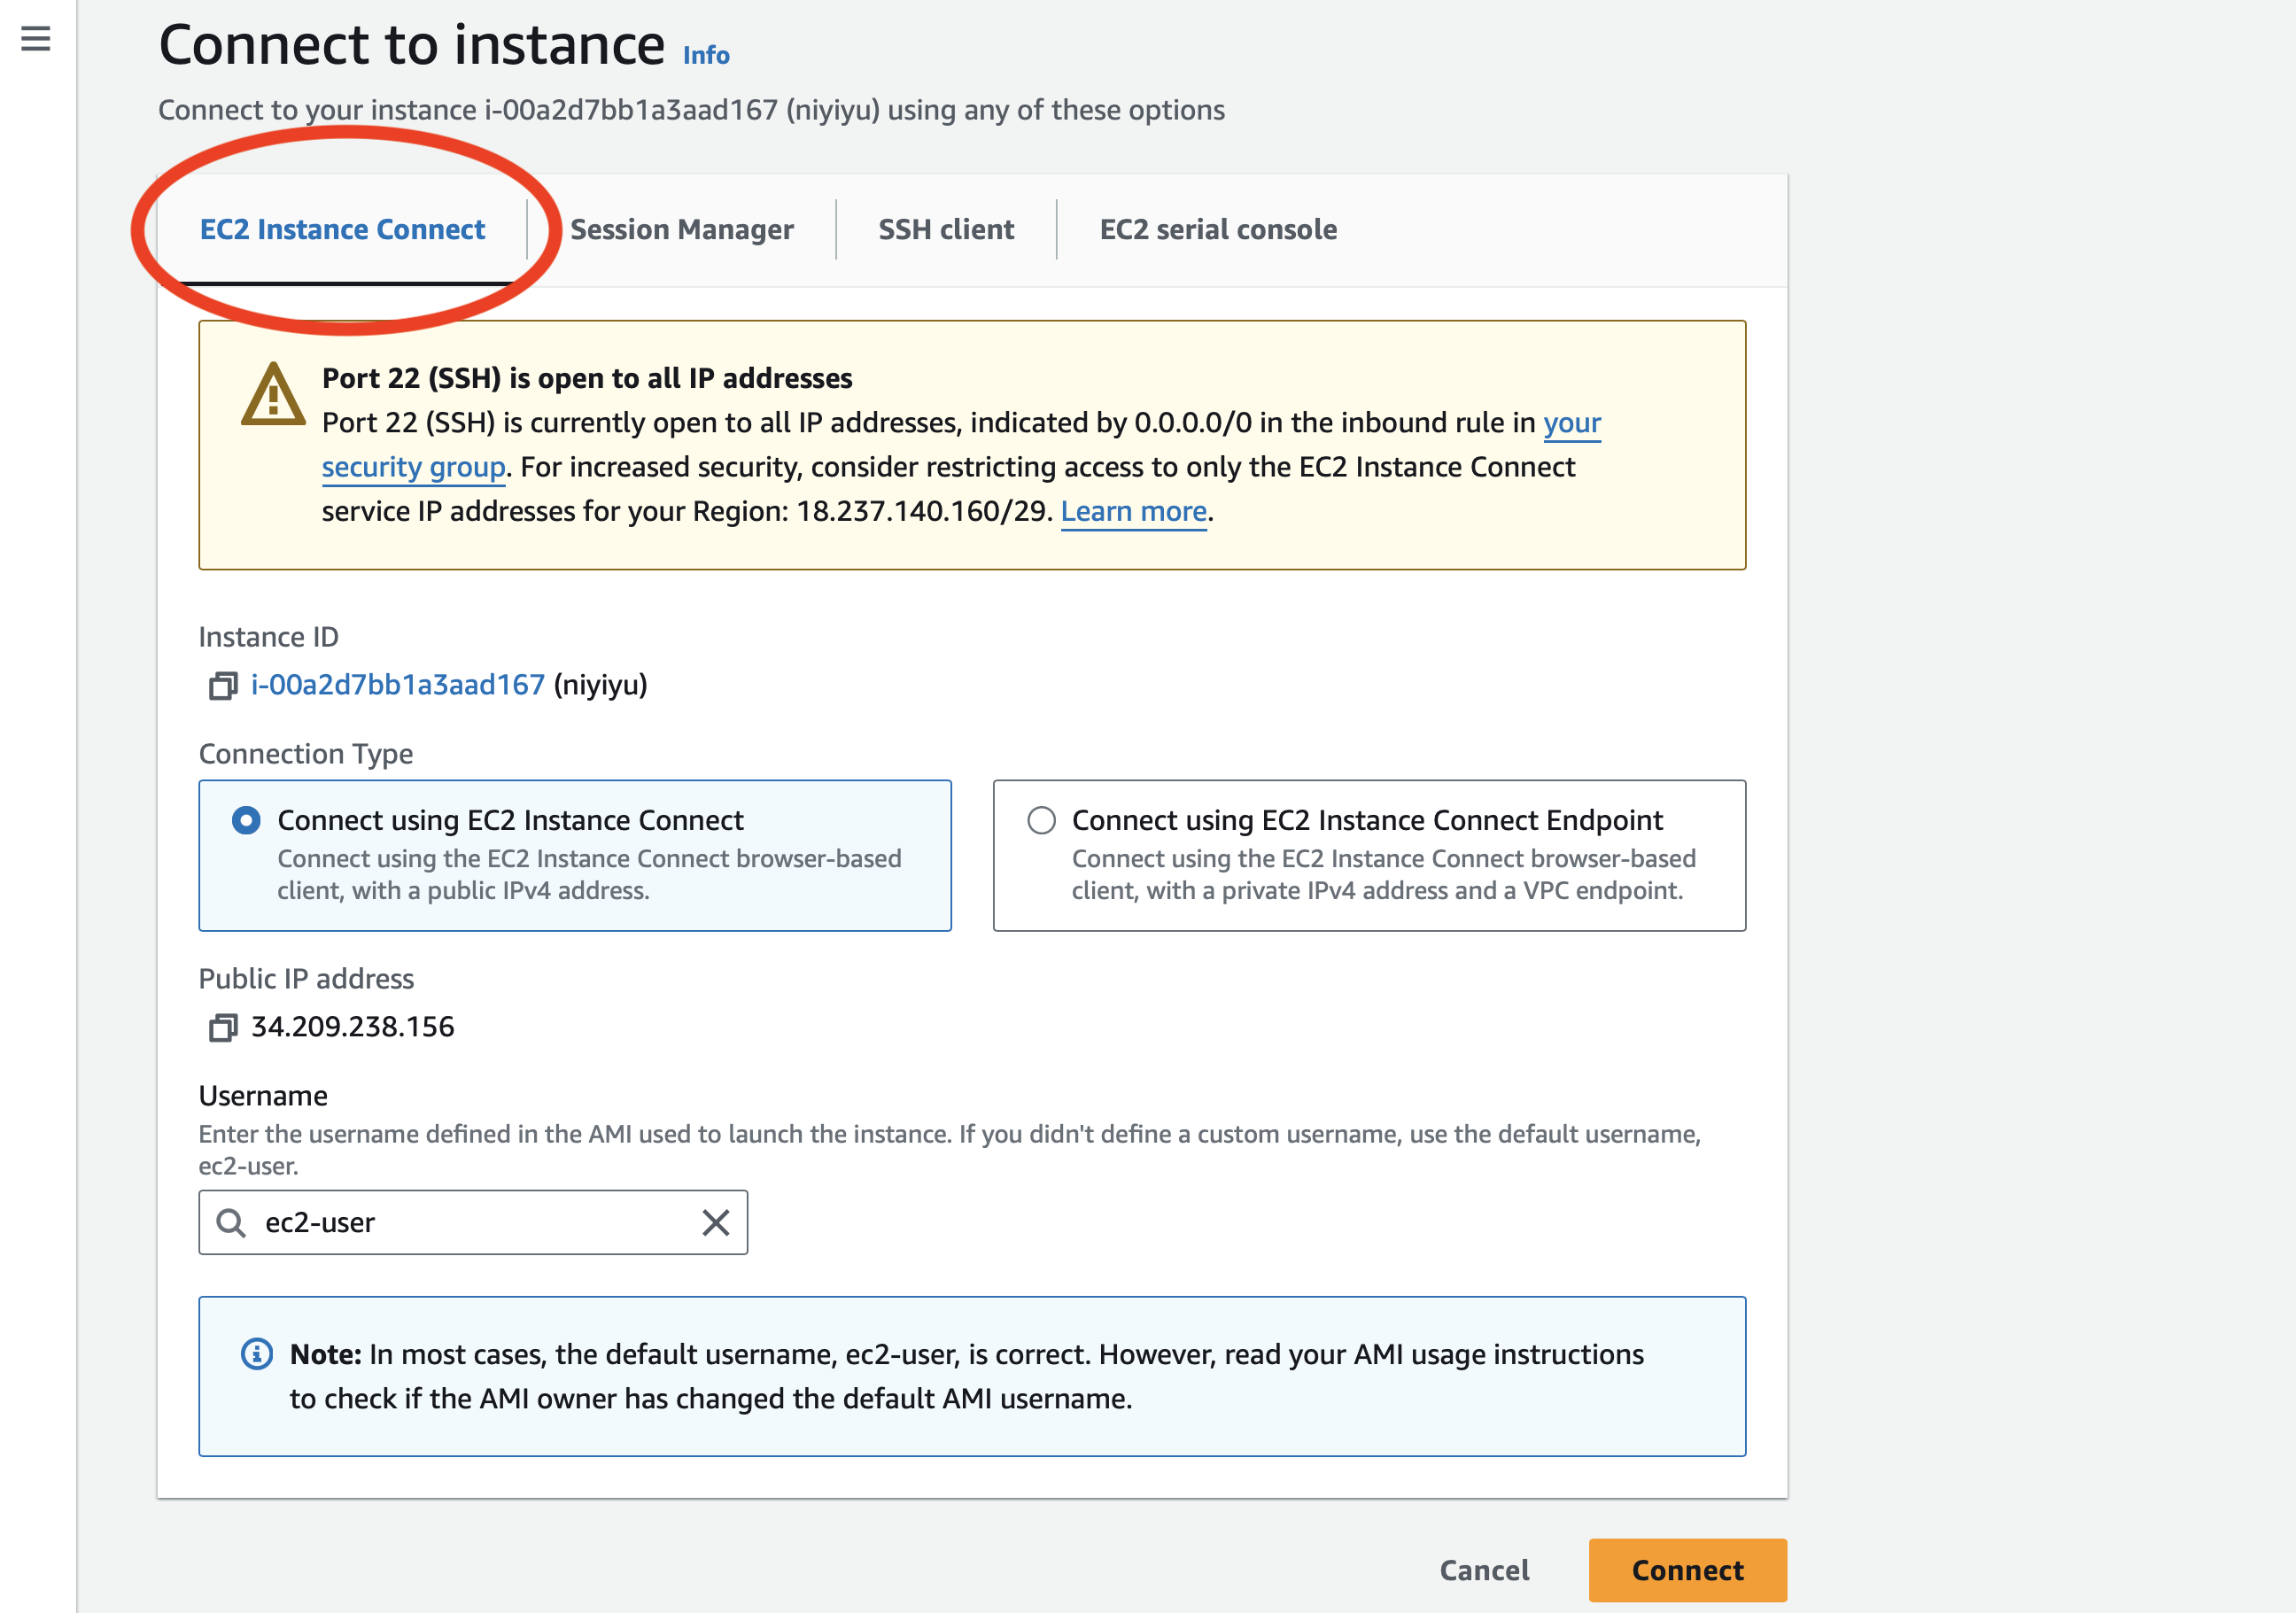
Runningstate on the console.Connect to the instance: AWS provides web-based connection where you don’t need to have a SSH client installed. Click on your instance -> Connect -> EC2 Instance Connect.

Note
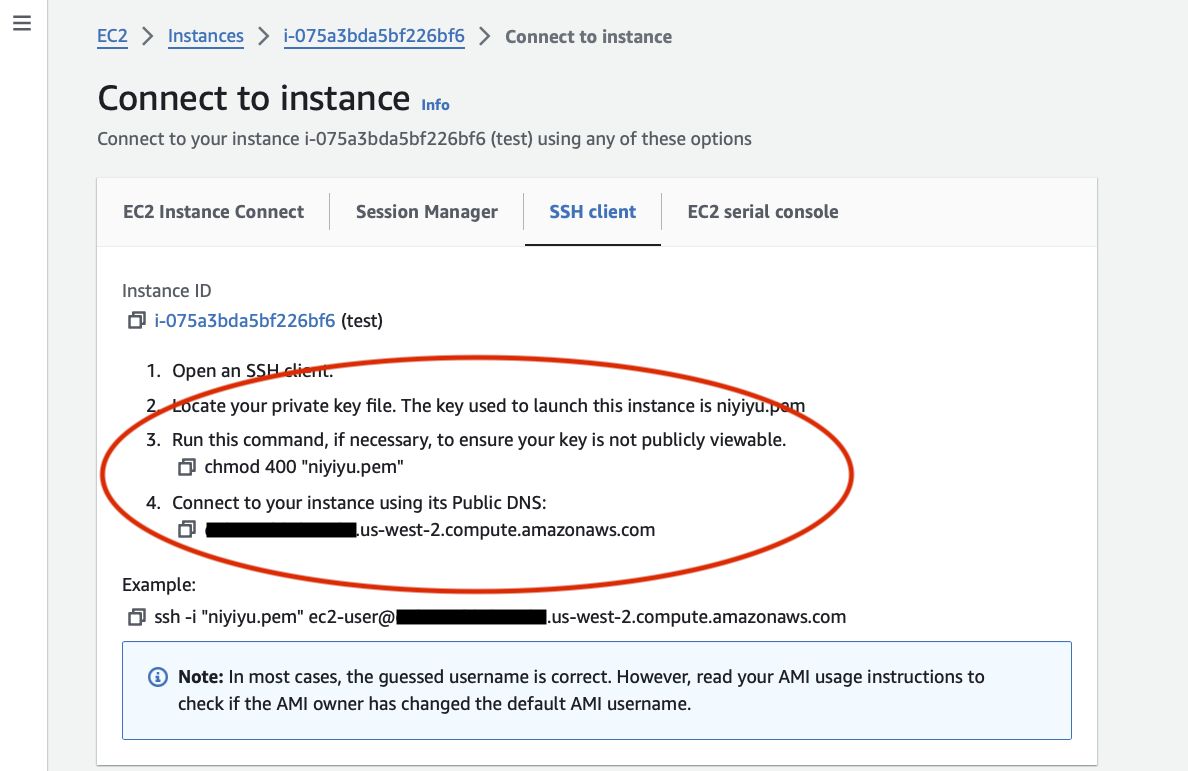
There are alternative ways connecting to the instance using the SSH client installed on your laptop. See the snapshot and the instructions below.

a. On Linux/macOS, copy the ssh link command in the folder where the PEM file is below and ssh to the instance. Be sure to change the permission of the key file so that it is only readable to you. You only need to do it once.
chmod 400 file.pem

ssh -i "file.pem" ec2-user@Your-Public-IPv4-DNS
b. On Windows, login to an EC2 instance using PuTTY (a free SSH client):
Open PuTTY. On the PuTTY Configuration screen, click Session in the Category pane.
In the Host Name (or IP address) box, paste
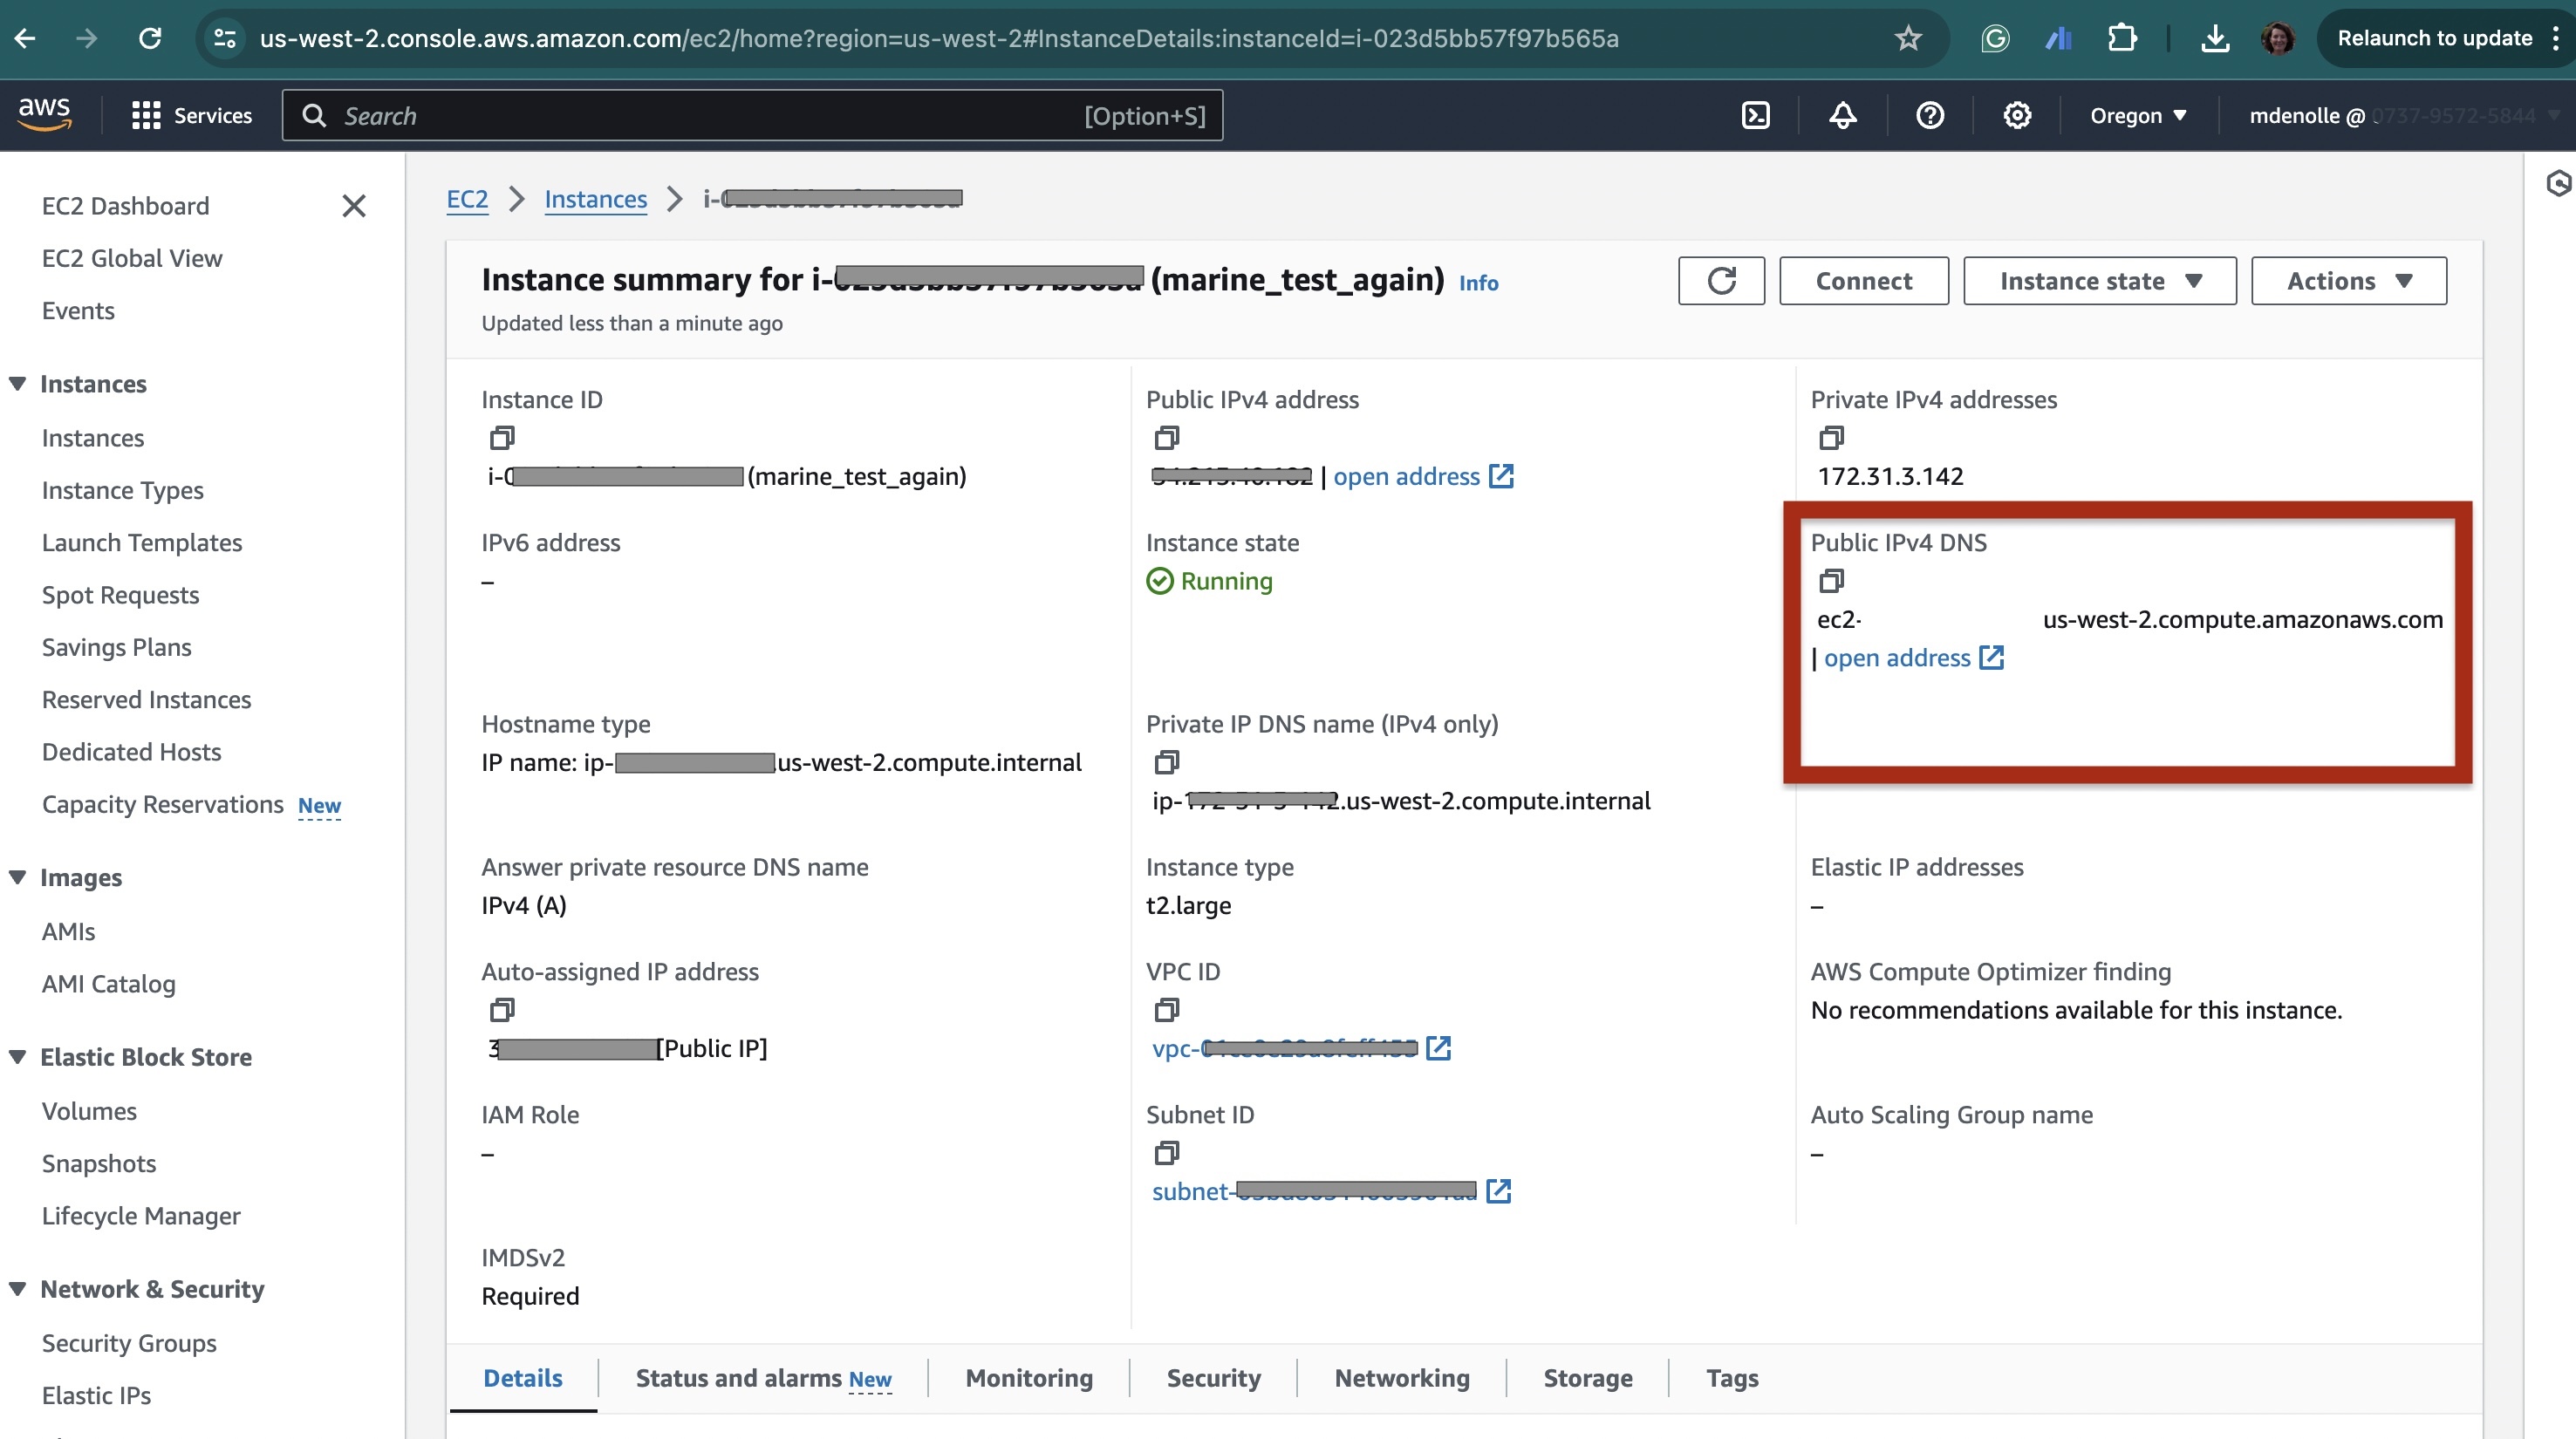
ec2-user@Your-Public-IPv4-DNS. Your public IPv4 DNS can be found in the details of your EC2 instance.Make sure Connection type: SSH is clicked
Back in the Category pane, expand Connection, expand SSH, and click Auth.
In the Private key file for AUTH/Credentials box, click browse and locate your
.ppkfile for the instance that you created and click. Depending on the version of Putty,Now click open and accept the connection.
Environment Configuration#
As you may notice, the EC2 you just launched has no user-specific software installed at all. We have two options to configure the computing environment for the instance.
Note
For workshop participants: Please follow Option 1 to install and use the Docker images.
Option 1: Use Docker image on EC2#
You can run codes within automatically generated Docker image. Please notice that some OS may require you to run the command line-by-line.
To install docker, run the following command.
sudo yum install docker -y
sudo service docker start
sudo usermod -a -G docker ec2-user
docker --version

# Upon successful installation, you would see:
# Docker version xx.x.x, build xxxxx
Pull the image. This will pull the Docker image named
seisscoped/seis_cloudfrom the GitHub Container Registry.sudo docker pull ghcr.io/seisscoped/seis_cloud:centos7_jupyterlab
Run the docker image as container. This will launch a Jupyter Lab within the container. The command also forwards port 8888 from the container to port 80 on the EC2 instance. The jupyter lab will then running at port 80 (default port of http service). The
IdentityProvider.tokenspecifies a password (scopedin this case) in order to access your Jupyter lab.sudo docker run -p 80:8888 --rm -it ghcr.io/seisscoped/seis_cloud:centos7_jupyterlab \ nohup jupyter lab --no-browser --ip=0.0.0.0 --allow-root --IdentityProvider.token=scoped &
Option 2: Manual installation#
Alternatively, you can manually configure your environment. To start from scratch, copy paste these commands in the terminal. Please notice that some OS may require you to run the command line-by-line.
sudo yum install -y git
wget https://repo.anaconda.com/miniconda/Miniconda3-latest-Linux-x86_64.sh
chmod +x Miniconda3-latest-Linux-x86_64.sh
./Miniconda3-latest-Linux-x86_64.sh -b -p $HOME/miniconda
./miniconda/bin/conda init bash
bash
Now you can install your own software, i.e., clone your repository, install your environment, run your scripts. We will illustrate with this example. Please notice that some OS may require you to run the command line-by-line.
git clone https://github.com/SeisSCOPED/seis_cloud
cd seis_cloud
conda create -y -n seiscloud -c conda-forge python=3.10 pip obspy
conda activate seiscloud
pip install -r requirements.txt
To download files from your EC2 instance:
scp -i "your.pem" ec2-user@Your-Public-IPv4-DNS:/home/ec2-user/seis_cloud/file .
If you are on Windows:
C:\> pscp -i yourkey.ppk ec2-user@Your-Public-IPv4-DNS:/home/ec2-user/seis_cloud/file C:\[local_destination_path]\[folder]
Opening a Jupyter Lab/Notebook#
To get the jupyter lab running:
jupyter lab --no-browser --ip=0.0.0.0 --allow-root --port 80 --IdentityProvider.token=scoped
An EC2 instance has two IP addresses: one for the AWS internal networking system, one open to the public. To access the notebook, you need to connect on the public IP address. Open a browser, type the IP address of the instance (see the Public IPv4 DNS). Then simply type the address in the browser. Be sure to use http://, i.e., http://Your-Public-IPv4-DNS. You can find the public IPv4 DNS address on the web console.

You will be prompted to window requesting for a token. Please enter scoped (case sensitive), as we specified in --IdentityProvider.token=scoped argument.
Note
There are alternative options to login:
Forward the port when login in the instance:
ssh -i "file.pem" user@Your-Public-IPv4-DNS -L 8888:localhost:80 -N
Open a browser and type
localhost:8888
Warning
We have experienced exception. Safari and Chrome may treat the connection as malware. These are warnings and can be ignored. You may find a way to continue on the browser.
Save the virtual image (optional)#
You can save the image (AMI) so that you can start from there next time. This can save time and effort in setting up the instance from scratch every time. Here are the steps to save the virtual image (AMI) of an EC2 instance in AWS:
In your AWS Management Console:
Navigate to the EC2 dashboard.
Select the EC2 instance that you want to save the image of.
Right-click on the instance and click on “Create Image” in the dropdown menu.
In the “Create Image” dialog box, enter a descriptive name for your image in the “Name” field. For this workshop, please use the format FirstName_LastName_Image_TutorialX.
Optionally, you can add a description and tags to the image for easier management later on.
Click on the “Create Image” button to start the image creation process.
Wait for the image creation process to complete. This may take several minutes depending on the size of your instance and the amount of data being saved.
Once the image has been created, it will appear in the “AMIs” section of the EC2 dashboard.
You have to save it every time you want to save the current state of the instance.
Terminating an instance#
What is the difference between stop and terminate and instance: saving data vs cost. If you stop, you do not pay for the hardware, but you will pay for the EBS volume only and the data is saved in the EBS volume. If you terminate, all data will be wiped and you will cease to pay.
Note
Visit here to read more about stopping vs terminating.
